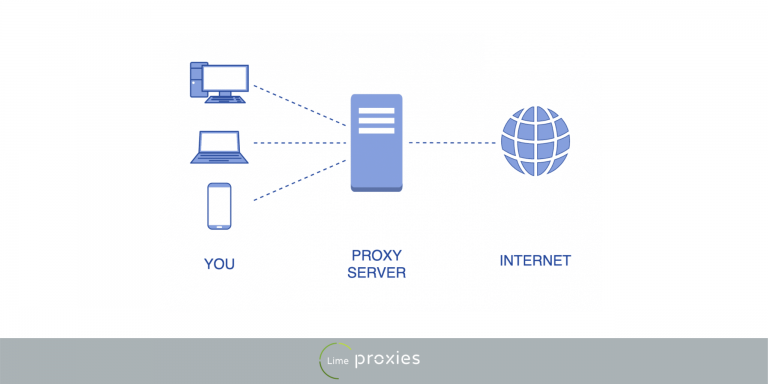
If you have come across the word “proxy’ several times and it confuses you, then you are in the right place to understand what that beautiful piece of technology is. Simply put, a proxy is an intermediate server between you and the internet. When you go online and make a search or launch a web URL, you are asking for a page to be displayed to you.
Normally this request would go directly to the appropriate server, but with a proxy, your traffic first goes through its server. The proxy server first processes your request before sending it to the web from where you get a response and the web you are requesting shows up.
There are different types of proxies and we would be having a proxy software comparison in this article.
Post Quick Links
Jump straight to the section of the post you want to read:
How A Proxy Server Works?
As an intermediary between you and the rest of the internet, a proxy server is also a computer. To understand how a proxy server works, we would use searching on google as a case study.
When you type in a keyword on google, it’s taken as a request from a user for information. The request would normally be sent to the site but if you are using a proxy server, the request would first be passed to the proxy’s server before being sent to the target site. The keyword you entered would be used to fetch the information you are requesting and then sent back to the proxy server, which sends it to your device. As long as this may sound, it’s a fast process.
A proxy server isn’t just an intermediary as you can connect to the internet without it. It’s important if you want to maintain internet privacy as it keeps you anonymous. When proxy servers process your request before sending it to the target site, it filters the valuable data like your IP address so that when you connect to the internet, your real identity stays hidden.
Interesting read: Comparing best proxy services in 2020
FORWARD PROXY AND REVERSE PROXY
Forward proxy and a reverse proxy are two fundamentals to understanding what proxies are.
FORWARD PROXY SERVER
A forward proxy server can be used to:
- Restrict users from visiting specific websites such as social networks, etc.
- Monitor the activity of users for example what your employees are doing while in the office
Forward proxies are usually what we refer to when we talk about web proxies. They help the user to retrieve data from another site and we would explain how using this analogy. Imagine there are 3 devices connected to the web:
X – visitor’s device
Y – forward proxy server
Z – the web server of the target site
Without the use of a proxy, traffic would flow from X to Z but depending on what the visitor wants from the target site, it’s better to connect to Z through Y. the visitor can choose to use forward proxies for any of the following reasons:
1. Anonymity: if you want to browse anonymously, a proxy will hide your real IP address so you can remain private.
2. Bypass limits: if you have been banned from a website by the website’s administrator, a forward proxy will give you access to the site.
3. To unblock websites: if you want to visit a website that is blocked from your access due to your location or by any other reason from your government, ISP, or internet administrator, a forward proxy would give you easy access.
So simply put, a forward proxy can give access to a user who has been blocked out of a website and can also provide anonymity by masking your real IP address.
A forward proxy is configured to process the request of a single or group of clients that are under the administrator's control and forwards the requests to a group of resources that are not under the administrator. You can relate this to a waiter, the chef, and the customers in a restaurant. The waiter takes the order from the clients and passes it to the chef who then prepares the food, hands it over to the waiter to serve the guests. The waiter here is the administrator, the guests are the clients, and the chef is the resource.
So basically a forward proxy is your everyday proxy, but for the sake of distinction, it is so named.
REVERSE PROXY SERVER
The administrator of a web server can use a reverse proxy to:
- Mask the web server’s IP
- Improve the site’s speed through CDN
- Scrub traffic
- Cache content
To explain how reverse proxy works, let’s go back to the scenario of 3 devices being connected to the internet where:
X – your device
Y – the proxy server
Z – the target site
Normally without a proxy, the user would connect directly from X to Z without the need for Y, but in some cases, the admin blocks direct access to Z and the user would have to pass through Y first. So just as with forward proxy, data is gotten from Z by Y for X.
This is not the same case as with forward proxy because in this case, the user doesn’t know he is communicating with Z as the only Y is accessible to the user. So in reverse proxy, the client doesn’t need to configure the proxy as its already been handled.
A reverse proxy is used because:
1 . The admin of Z is scared of exposing the site directly to visitors to avoid malicious attackers on the main server.
- Z wants to ensure that all visitors’ requests pass through Y first before being sent to Z. an example can be seen in CDN (Content Distribution Network) which helps in faster website speed. Many servers are set up and a reverse proxy is used to direct traffic to the nearest server for faster speed.
TYPES OF PROXIES
There are different types of proxies and each is based on different criteria like internet protocol, IP address, speed, security, etc.
TYPES OF PROXY BASED ON INTERNET PROTOCOL ADDRESS
There are two main types of forward proxies based on IP address; the residential proxy, and datacenter proxy.
1 . HTTP PROXY
An HTTP proxy is a server that handles HTTP(s) requests due to its extra security that only permits requests on certain IPs and ports to go through. An HTTP proxy is like a forward proxy and acts as a middle man between you and the internet.
HTTP proxy processes HTTP requests that come in the form IP:Port. The request from the client is transferred in the form of a complete URL and the proxy makes the request more specific so that only the relevant results are obtained. It also retains your anonymity as your IP address doesn’t send the request but rather the IP of the proxy server. So you are shielded and your online activities won’t be monitored.
HOW TO INSTALL SQUID PROXY ON CENTOS 6
1. Step 1
Spin up a CentOS 6.3 z64 droplet

2. Step 2
Install squid using the following command:
yum -y install squid
chkconfig squid on
3. Step 3
Setup access restrictions. This is important since the squid proxy would allow connection to anyone using it from your droplet’s IP address. You can register free dynamic IP from a service like noip.com
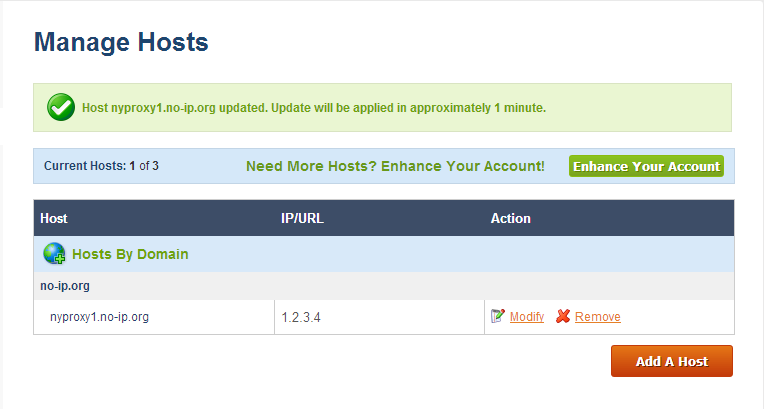
If you want to use squid from your phone, you would need a dynamic DNS update client. You can use an app like Dynamic DNS Client for android OS, and FreeDynPro for IOS. Once you have installed the dynamic IP hostname, you can update it from your mobile device, router, or an API call.
Add the hostname to /etc/squid/squid.conf. Edit the file and add your hostname. We would be using nyproxy1.no-ip.org.
acl localnet src nyproxy1.no-ip.org
Setup a crontab that would reload squid regularly per hour in case your IP address changes:
echo 0 */1 * * * service squid reload >> /var/spool/cron/root
4. Step 4
Configure your squid proxy. By default, squid’s port is 3128. You can modify /etc/squid/squid.conf
http_port 3128
If you want to use squid proxy but have it go undetected as a proxy, set up anonymous settings with the following added to /etc/squid/squid.conf
via off
forwarded_for off
request_header_access Allow allow all
request_header_access Authorization allow all
request_header_access WWW-Authenticate allow all
request_header_access Proxy-Authorization allow all
request_header_access Proxy-Authenticate allow all
request_header_access Cache-Control allow all
request_header_access Content-Encoding allow all
request_header_access Content-Length allow all
request_header_access Content-Type allow all
request_header_access Date allow all
request_header_access Expires allow all
request_header_access Host allow all
request_header_access If-Modified-Since allow all
request_header_access Last-Modified allow all
request_header_access Location allow all
request_header_access Pragma allow all
request_header_access Accept allow all
request_header_access Accept-Charset allow all
request_header_access Accept-Encoding allow all
request_header_access Accept-Language allow all
request_header_access Content-Language allow all
request_header_access Mime-Version allow all
request_header_access Retry-After allow all
request_header_access Title allow all
request_header_access Connection allow all
request_header_access Proxy-Connection allow all
request_header_access User-Agent allow all
request_header_access Cookie allow all
request_header_access All deny all
5. Step 5
Start squid proxy
service squid start
6. Step 6
Edit your browser’s proxy settings by adding your droplet’s IP address and port to your browser’s settings
7. Step 7
Check that squid works
GUIDE TO MAKE YOUR PRIVATE PROXY WITH SQUID PROXY
Installation and configuration
In installing squid, the first step is to get your VPS server. As long as you have SSH access and the ability to install apps, you can use any server host.
Once you have your VPS server or any dedicated server running, you can now work towards installing squid. Note that this tutorial is for Ubuntu.
1. Step 1 – Installation
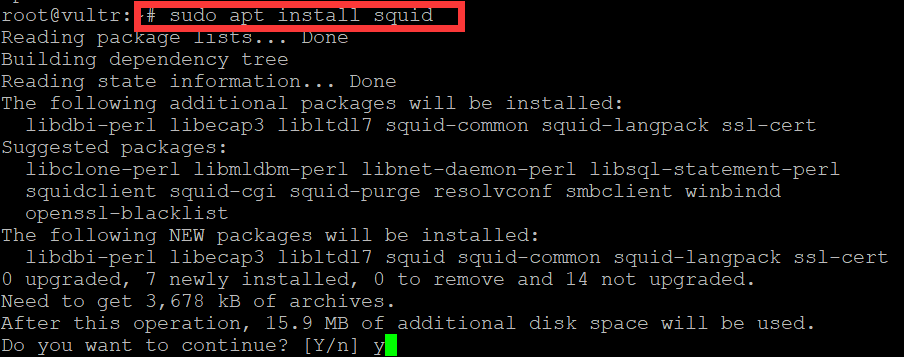
The first step is the installation of squid proxy. It's easy and only requires the following commands to be entered:
sudo apt install squid
You can omit sudo if you are logged in as root, but its not a recommended practice to run the process if you are logged in as root.
2. Step 2 – Configuration
After installing squid, it’s now time for the configuration so it can work the way we want. the configuration file for squid is stored in /etc/squid/squid.conf. some other files are necessary to have a properly functioning squid proxy:
- Squid access log: /var/log/squid/access.log squid
- Cache log: /var/log/squid/cache.log

Those files permit installation monitoring. So if there is any problem during installation, squid will be able to access the files to find out what the problem is.
Before you edit your squid configuration, you need to copy it and you can do that with
sudo cp /etc/squid/squid.conf /etc/squid/squid.conf.originalsudo chmod a-w /etc/squid/squid.conf.original
sudo chmod a-w /etc/squid/squid.conf.original
This way you can easily revert the changes you have made in case you want to go back to the original configuration file. When altering configuration files in Linux, it’s a good idea to always have a backup.
By default, squid operates on proxy port 3128.
http_port 3128
it’s a good idea to change it and you can do so with
http_port 5555
the 5555 is just here for the sake of example and you can change it to whatever you like. Focus on using nonstandard ports because this way, you have better chances of your ports not being discovered.
Next is to change the visible hostname of the squid install. It mustn’t be a valid hostname and it must not be anything that can be identified. We would use gg
Visible_hostname gg
Now that we have set that up, let’s set the access control. At this point, no one can use your proxy server. Not even you. you can choose to change it so everyone can use it but doing so would change it to a public proxy. Head to the ACL section of squid.conf configuration file. At the bottom, add
acl nameofpersonwhoshouldbeallowed src 192.168.42.0/24
3. More Access Control in Squid
At the top of the http_access section, add
http_access allow nameofpersonwhoshouldbeallowed
Doing this now gives the user who should be allowed, access and permission to use the proxy server. You should have authentication on your proxy server.
After everything has been done, restart the service
SUDO SYSTEMCTL RESTART SQUID. SERVICE
HOW TO SET UP WEB PROXY SERVER USING INTERNET INFORMATION SERVICES WITH APPLICATION REQUEST ROUTING
The internet information service (IIS) was created by Microsoft and it simplifies the task of rerouting URL requests for clients. Using this feature and a proxy server will unlock great features on your computer, and save you a lot of time too.
To set up, first go to your control panel and click on “Items”, then go to “Programs and Features”. You will find an option to turn on “Windows Feature”. Activate it. Doing this will trigger a prompt, asking you if you wish to enable the internet information service feature.
Expand the window after enabling the internet information service feature and proceed to “Web Management Tools”. Go to “Common HTTP Features” and choose “HTTP Redirection”. Close the window. Files for your IIS feature will begin installing and it will take a while. After installation, the IIS feature would be activated and it can now act as a web proxy capable of rerouting and processing your HTTP requests.
Even though activating the ISS feature allows us to reroute HTTP requests, we need to be able to rewrite the URLs so that we can reroute our requests based on our preferences. To do this, we would need the ARR (Application Request Routing). You won’t find any ARR or URL rewrite features for changing the URL between internal and external domains in “Downloads” or “IIS Manager”
This feature can be found on the Microsoft website. Search for it and click on the download option. A prompt would appear asking you to either save and run on your computer or run it directly over the internet. Make your choice and once done the files for the ARR feature would be installed. One of the files is the “Web Platform Installer”. Open it and you would be provided with the option of installing the ARR feature from among other features. Many variants of the ARR feature would be on the list and each one is meant to attend to the bifurcated configurations of different computers.
If you don’t know your computer’s specifications, don’t panic. Select the ARR 3.0 and the URL rewrite 2.1 features. These variants are the most accommodating on the list and are most likely to work for you. a dialog box will appear for your confirmation of the selected program. Check that it displays the selected program before confirming it. After confirmation, the files for the features would be installed on your computer automatically and it will take a while. After installation, check the internet information services manager on your computer and you will see both the URL rewrite 2.1, and the ARR 3.0 features.
If any of these features are missing, look back at the installation process in case you did anything wrong.
SOCKS PROXY
A socks proxy can be regarded as a general purpose. It routes traffic back and forth between the client and the target server through a TCP connection. The best part about the socks proxy server is that it can be used with any internet protocol, making it versatile and efficient. Unlike with the web proxy server where the requests are specific, Socks proxy doesn’t make changes to the request and regulates it as it is. It’s mostly used to bypass firewalls and to access programs on the outside resources.
Before Socks is used, the browser must be configured so that it is Socks enabled, this way, your browser will be able to connect to the Socks proxy or server, allowing the browser to bypass firewalls and have access to programs.
When users are caught between HTTP and Socks proxy, they tend to consider speed. The difference in speed between the two is not that much and so it shouldn’t be the deciding factor. In terms of coding, Socks are simpler and due to this, it can download data faster when compared to HTTP.
When working with different applications, it’s important to choose the proxy type that would work with most applications. HTTP proxy works with most applications compared to Socks, but this doesn’t mean you should completely rule out Socks as some applications work with it too.
HOW TO SET UP A SOCKS5 PROXY SERVER
The easiest way for you to create a SOCKS5 proxy server is to find a web hosting or VPS that supports the SSH. Using this SSH tunnel, set up the SOCKS proxy and then access the server with your browser using Putty.
SET UP A SOCKS PROXY ON LINUX/MAC OSX SERVER WITH SSH
Setting up the SOCKS5 tunnel can be done in two steps; the first is to build the SSH tunnel to a remote server. The second is configuring your browser to connect to the exposed TCP port which would be used to transport data through the remote SSH server.
1 . Open an SSH connection to a remote server. Doing this will simultaneously open a local TCP port that’s available to only your computer. In this guide, we would be using the local TCP port: 1337
- Configure your web browser; either chrome or Firefox to use that proxy instead of sending requests directly to the internet
- Your SSH connection would be accepted by the remote SSH server and will serve as the outgoing proxy_/vpn_ for the SOCKS5 connection. Use the following command in your terminal to start the connection
$ ssh -D 1337 -q -C -N user@ma.ttias.be
The command would:
-D 1337: open a SOCKS proxy on the port 1337. If the port is unavailable, try a different port number. To open multiple SOCKS proxies to multiple endpoints, choose a unique port for each one.
-C: it compresses the data in the tunnel to reduce used bandwidth
-q: this is the quiet mode. It doesn’t give any output locally
-N: it’s useful for forwarding ports and doesn’t execute remote commands
user@ma.ttias.be: this is the remote SSH server you have access to
once you run the command, ssh will remain in the foreground until you use CTRL+C to cancel. If you want to keep it running in the background, add –f to attack it to a background command:
$ ssh -D 1337 -q -C -N -f user@ma.ttias.be
by this, you have an SSH tunnel between your computer and the remote host which in this case is ma.ttias.be
Use SOCKS Proxy in Chrome/Firefox
The next thing to do is to configure your browser to send requests through that proxy. Since this isn’t a system-wide proxy, you would need to configure it per application.
For chrome:
Go to chrome://settings/ and click on Advanced Settings. Go to Proxy Settings.
For Firefox:
Go to Preferences > Advanced > Network, and look for Connection Settings.
Once at these points for each application, change them accordingly
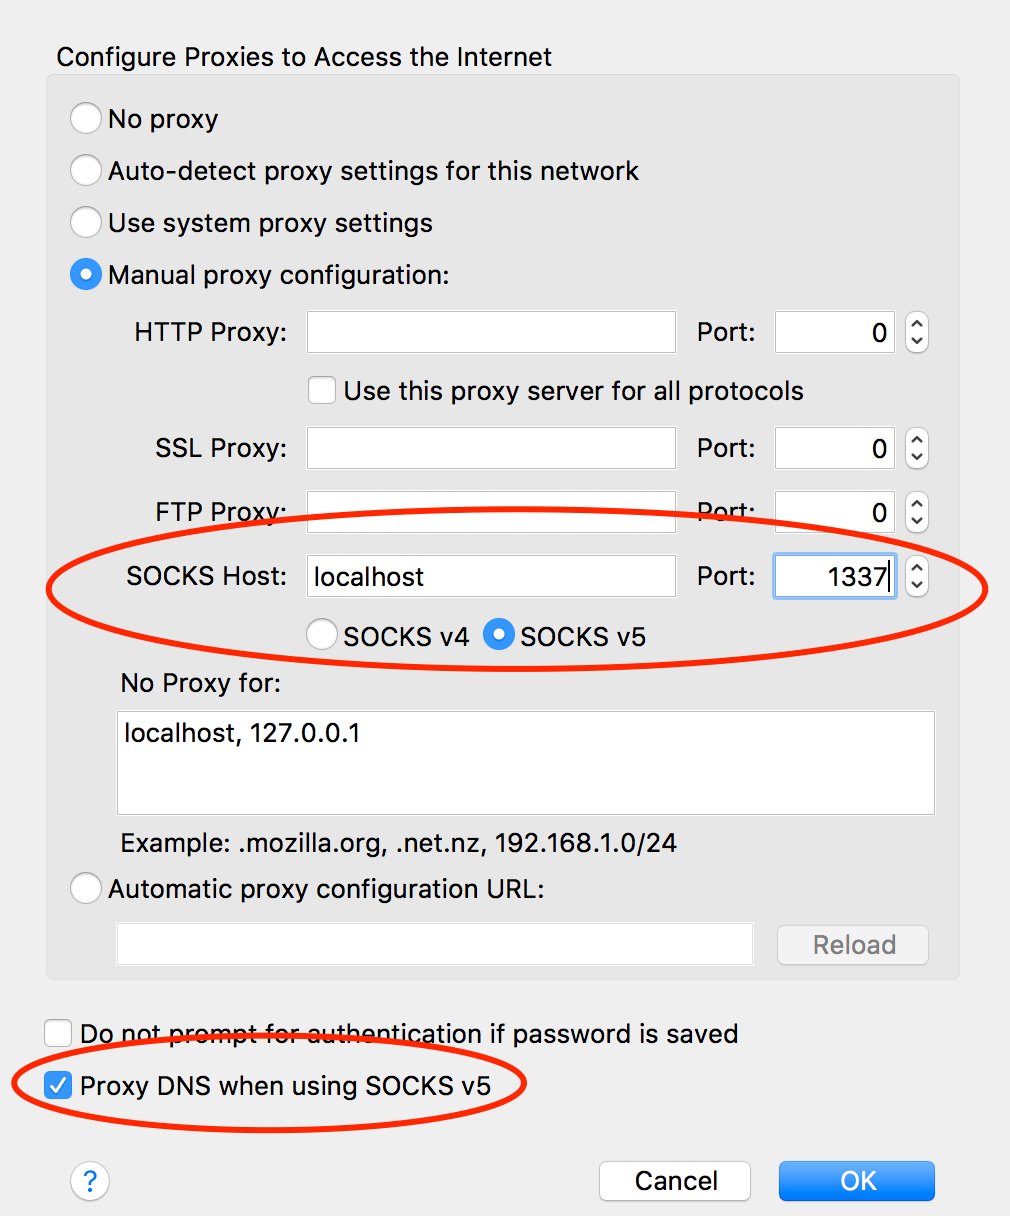
From this point, your browser would only connect to localhost:1337 which is selected as the remote server by the SSH tunnel.
Encrypted Traffic
This is one of the advantages you stand to gain as most of your traffic would now be encrypted. What is shared between the browser and SOCKS proxy is encrypted if you visit an HTTPs site, but would be in plain text if you visit an HTTP site. In simple terms, some parts of the proxy are encrypted while others are not.
Bypassing Firewall Restrictions
If you only have limited access, you may not be allowed to open an SSH connection to a remote server. What you can do as an alternative is to run the SSH server port on more ports like :80, :443, or :53. Your best chance would be with :443 as its already encrypted and is less likely to have deep packet inspection middleware blocking your connection.
Testing Your SOCKS5 Proxy
Test that your configuration was successful by visiting any website that shows your IP address before the configuration, and after the configuration. If it works, your IP address would change to that of the remote SSH server.
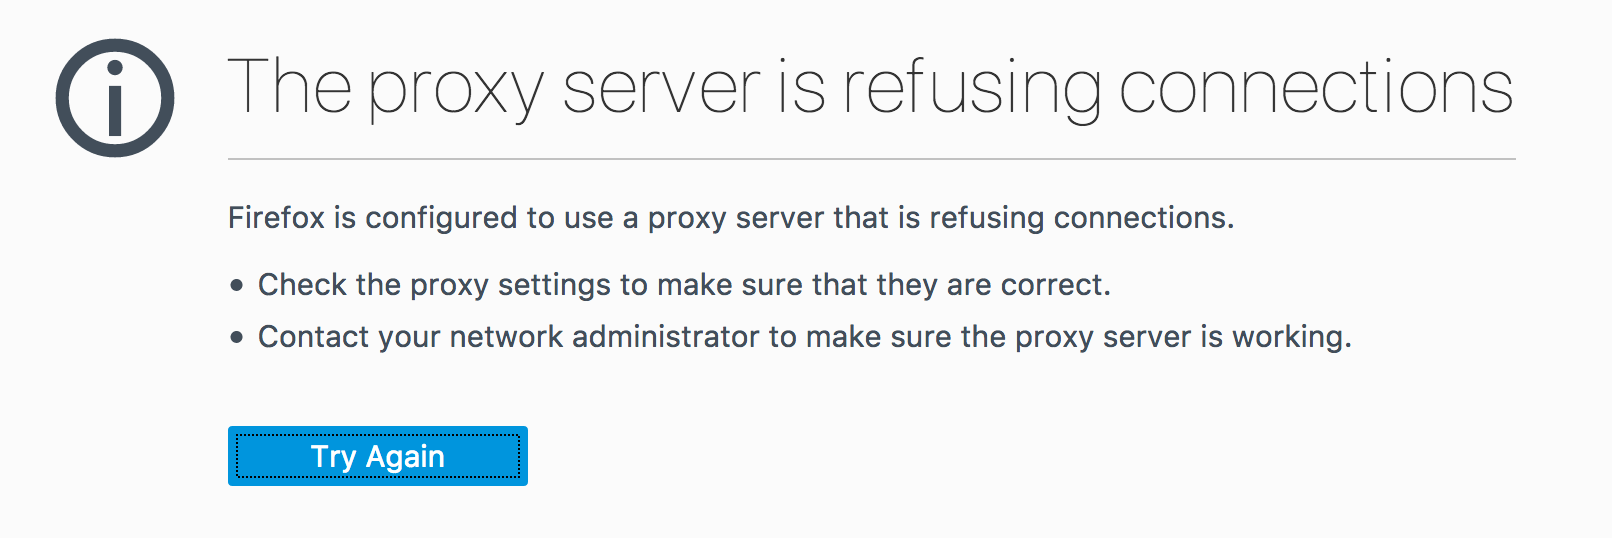
In case your SSH tunnel is down, your browser would inform you and you can restart ssh and try a different port or check your firewall settings.
HOW TO USE PUTTY AND SSH TUNNEL AS A SECURE SOCKS PROXY
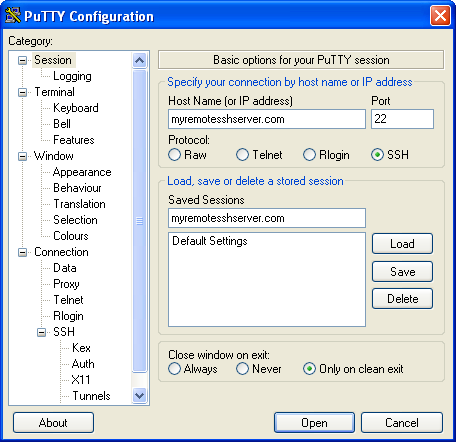
1 . Configure the Host Name or IP Address
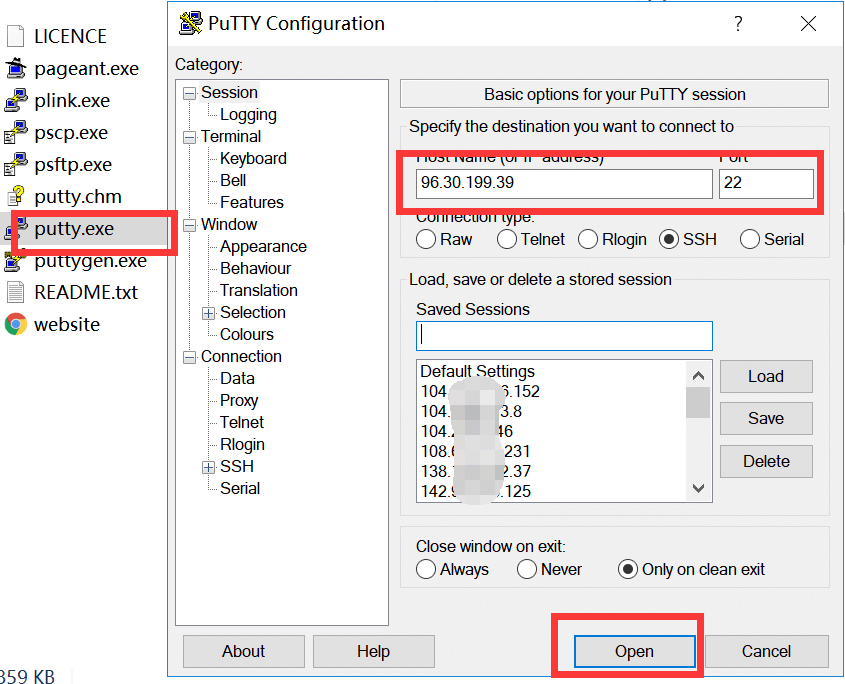
On putty configuration window, run putty. Type in the hostname or IP address of the remote server in the hostname or IP address field. If you have domain name resolution to allow access to your network via a domain name, this could be the domain name for your network.
2. Fill in Port
SSH usually listens on port 22 but it’s not always the case and depends on how port forwarding is set up on your trusted network.
3. Add Source Port
Open Connection > SSH > Tunnels. Fill in the port number that would be used locally.
4. Select the Dynamic
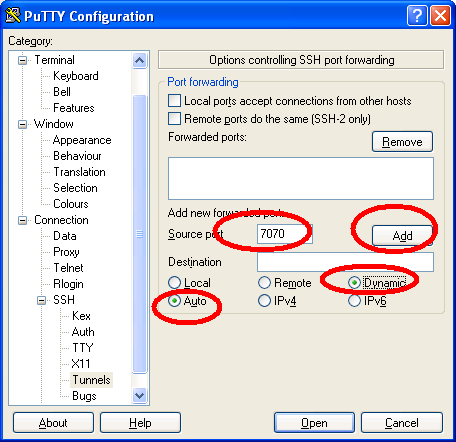
- Go back to the session tab located at the top of the menu and input the new connection name. then click on save. After saving, open settings again to make sure you can retrieve the tunnel settings then click on open to connect. You would be required to provide a username and password on the remote system before the connection can be established. You can use this connection to log in to your server, after which you can use the connection as an SSH tunnel and your SOCKS proxy.
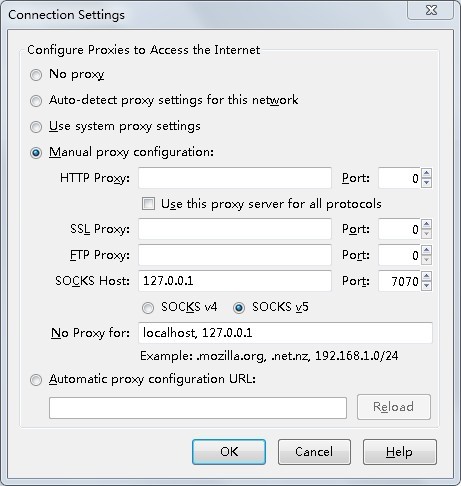
Configure Firefox to Use This SSH SOCKS Proxy
Open Options > Advanced. Select the network tab and click on settings. Then fill in the following:
1 . Configure proxies to access the internet: choose the manual proxy configuration
- SOCKS Host: input 127.0.0.1
- Port: for SOCKS host, use the port number you used in the putty tunneling dialog
- Click on OK and you’re good to go
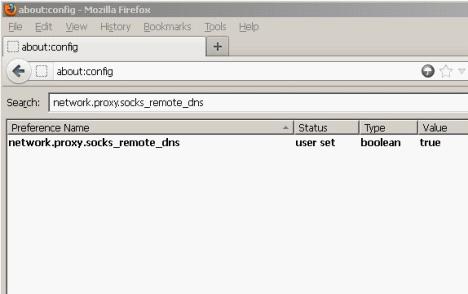
- Open about:config page and change the network.proxy.socks_remote_dns to true
TYPES OF PROXY BASED ON IP ADDRESS
There are two main types of forward proxies based on IP address; the residential proxy, and datacenter proxy.
DATACENTER PROXY
Datacenter proxies are rented from companies and web services like Amazon, Microsoft azure cloud, and so on. These IPs are rented from the companies and they provide you fast and stable connections. Some proxy service providers provide the user with a dedicated IP that is used by none other. These dedicated IPs are usually more expensive because just as you enjoy the performance alone, you would bear the whole cost alone.
RESIDENTIAL PROXY
Residential proxies provide real IPs from an ISP that are wired to real homes or a cable. Every internet user be it a business or individual requires a residential IP address and since these types are real, they are difficult to be spotted. Using this type of proxy, just as with other types of proxies would mask your real IP address, leaving only the IP address you have chosen.
OTHER TYPES OF PROXIES
DNS PROXY
DNS is short for Domain Name System. It has a variety of uses and features, one of which is the DNS proxy cache. Whenever a request is processed by a DNS proxy, the request is stored in its cache. This is to enable proper request tracking and configuration monitoring in case a previous resolution fails DNS proxy passes DNS requests to the public network DNS server which then sends the response to the client’s device.
3 popular public DNS IPv4 addresses:
1 . Cloudflare IPv4 DNS
1.1.1.1
1.0.0.1
- Google IPv4
8.8.8.8
8.8.4.4
- OpenDNS IPv4
208.67.222.222
208.67.220.220
3 popular public DNS IPv6 addresses
- Google IPv6 DNS
2001:4860:4860::8888
2001:4860:4860:8844
- OpenDNS IPv6
2620:0:ccc::2
2620:0:ccd::2
- NTT/Verio IPv6 DNS
2001:418:3ff::53
2001:418:3ff::1:53
Unlike with other proxies, the requests are in their resolved forms already. So when next you send the request, you won’t have to wait for it to be processed as its already stored in the cache. This saves time and saves you from Network Latency Delay.
You can also rewrite DNS proxy rules using DNS proxy, and this allows requests from different servers to be rerouted to prevent any inconvenience.
WEB PROXY
If you spend most of your time on the internet, you must have used web proxies at least once. A web proxy acts as a shield between you and the target website so that you can remain anonymous as you interact with the website.
As with other websites, your traffic doesn’t go to the website directly but the web proxy sends your processed request on your behalf. So technically, you would have never connected to the website at all. Web proxies are mostly used to hide identity.
CGI PROXY
CGI stands for common gateway interface and comes in pretty handy it comes to the user in the form of a webpage, and the user can connect to different websites through this webpage. The webpage isn’t a proxy, but its advanced features allow a user to access different links anonymously.
Since it's written using the Perl Programming Language, it can be used on any server or computer that can run Perl using CGI. Many protocols and formats are supported by this proxy, for example HTTP, FTP (File Transfer Protocol), and SSL (Secure Socket Layer). The major problem of this program is its unavailability as an open-source program. It has however been modified to allow users to modify it to suit their own specific needs.
SUFFIX PROXY
A suffix proxy is pretty self-explanatory. Just as its name goes, it adds its name to the end of a URL that it's processing. By so doing, the browser can bypass restrictions and have access to programs and websites.
Suffix proxies serve two main functions; firstly, they speed up a user’s access to a resource. They use caching data and previously stored search requests which are now easily retrievable when the same search is made in the future. The second purpose of suffix proxies is to ensure that the user remains anonymous.
The user’s anonymity is ensured using traffic filtration whereby the user’s requests are processed and evaluated to see if it can be linked back to the user. Suffix proxies are one of the easiest to use but are rarely used because they don’t promise a great deal of privacy and anonymity. The proxy processes traffic using the user’s real IP address and if the request is passed on to an external source, the user’s IP address can be seen.
Benefits of Using a Proxy
A proxy server is an encrypted and privacy providing program that changes your IP address and encrypts your browsing sessions so that your activity remains protected.
Pros of Proxies for Personal Use
- Protects your personal information
- Masks your real location and sends requests using the proxy’s IP address
- Prevents your ISP from tracking you
- Keeps your personal and sensitive data private
Pros of Proxy for Travelers
- When traveling, it's most tempting to connect to the internet via Wi-Fi. Doing this puts you at risk as those who are near you and on the same network can see what you are doing just by using simple packet sniffing software. Using a proxy encrypts your connection and keeps you safe from malicious attackers so that your traffic and data is protected.
- Sometimes the hotspot you connect to isn’t genuine but built by hackers to route all your traffic through their connection. This way they can get access to all your activity and steal your data. With a proxy, however, you will remain protected and your data encrypted even if your connection is to a malicious hotspot.
- Even if you are connecting to someone else’s hotspot, you can’t be sure of your safety. The person’s connection may be monitored or already compromised and by connecting you are putting yourself at risk too. So always connect via a proxy as this will ensure that you are secure at all times.
Pros of Proxies for Business
- You can publicize your website and business like a user and not the company’s owner with the use of a proxy. This is possible by connecting to a different IP address that won’t be recognized as your company’s. doing this will help you bring in more potential customers as your testimony as a user is the best advert most times.
- When you visit your competitor’s website with your real IP address, they know you are snooping around. Some competitors can even direct you to a dummy website where they will feed you wrong information and mislead you. but with a proxy, you can do your research while staying anonymous.
- Websites can block you with cookies and your IP address especially if you are extracting data. Proxies offer you a pool of IPs you can rotate while performing your task so that it’s difficult to be caught and blocked.
- When posting on websites and you reach the limit, the site can block you. proxies allow you to rotate your IP address or choose another IP address when blocked so you can continue posting. So with a proxy, there is no restriction on your online business marketing.
Cons of Using a Proxy
Proxies have a lot of benefits and those are what you will mostly hear when the discussion of proxies comes up. Despite all these, there are some downsides to the use of proxies.
Most proxies have a cache data storage which facilitates the searching of content online. While this is a great feature, it can’t differentiate between data you want to store and the none you don’t want to be stored. As a result, your passwords and other sensitive data can remain stored in proxy servers.
Some proxies make use of SSL encryption to keep you anonymous, but SSL protocol isn’t unbreakable and a hacker with good knowledge of this language can crack it. Doing this will leave your data vulnerable and all that you have been trying to protect would be available to cybercriminals.
Some proxies are malicious themselves and corrupted, and will upload malware and other harmful programs into your computer instead of returning the required results from your request.


About the author
Rachael Chapman
A Complete Gamer and a Tech Geek. Brings out all her thoughts and Love in Writing Techie Blogs.
Related Articles
Cooking Sneakers: How Proxies Can Help Reduce Captchas During Sneakers Purchase
Sneakerheads know here How Proxies Can Help Reduce Captchas During Sneakers Purchase and be the first one to so.
How To Stream Netflix and YouTube From Any Country Using Proxies
The two most popular online video streaming platform in the world are, without a doubt, Netflix and YouTube. Statistics says that YouTube has 1.3 billion users worldwide, and around 5 billion videos are watched on the video streaming platform every day. Netflix, meanwhile, is saying that they have around 104 million subscribers around the globe. These numbers are prett