

QUICK LINKS:
- What are Reverse Proxies?
- Setting up NGINX Reverse Proxy
- Step-by-step guide to install NGINX Plus on these operating systems:
Introduction
To understand the concept and functionality of a NGINX reverse proxy there are a few things that are to be known first. Among those, understanding the operation of a proxy server, getting a basic idea of reverse proxies, and a few other things are paramount. Otherwise, setting up a NGINX reverse proxy would be next to impossible. So here are a few primary things that should help in creating proxies.
What is a Proxy Server?
Also known as “application-level gateway” or simply “proxy”, this is a computer that acts as a bridge between a system or a number of systems and a larger network like the internet. Proxy servers are used to improve the security, privacy, and the performance of the connection. They can also be used to monitor website traffic on the network that is being used in some cases.
Interesting Read: WHAT IS PROXY SERVER AND HOW IT WORKS?
How do Proxy Servers Work?
A proxy basically acts like a tunnel, in which data enters through one end and is sent out through another. This severs the direct connection of users with the larger network and helps in keeping the connection private, thus protecting sensitive data from hackers and keeping the users safe. Proxy servers also help in preserving the anonymity of users. There are also proxy servers which are groups of applications or servers which work on a much wider scale and block some common internetservices, two such examples are HTTP proxy which intercepts website access, and SMTP proxy which intercepts emails.
What are Reverse Proxies?
Well, the primary definition of a Reverse Proxy is a proxy server that is software-based, unlike the normal proxies which are hardware based. Reverse Proxy servers act as the gateway between external users and internal applications, they assimilate, sort, and then distribute client requests in a way that all the requests reach their designated servers. NGINX reverse proxy is used all around the world in bulk-traffic websites as well as in small internal networks as it has a number of advanced features which exponentially increase the performance, and also help in providing a smooth workflow. Here some of the basic functions of reverse proxy servers are discussed:
Load Balancing– When working with multiple servers, the most important task is to keep workflow balanced between all the servers so that none of them get overloaded. This is the primary task of a Load Balancer. Also, if in any case a server goes haywire and shuts down then the Load Balancer distributes the extra processing task equally between the remaining online servers. This helps is keeping the website/program up and running even if one or a few of the servers are offline. Load Balancing is done to keep a smooth and efficient workflow even under heavy load. This also acts as a contingency in case of server failure.
Web Acceleration– The process of speeding up the rate of data transfer between client browsers and web servers is known as web acceleration. At any point of time, there are hundreds of thousands to millions of users who access some of the high-traffic websites, and these websites have to provide their services even under these tremendous traffic conditions. To deal with this, some organisations tend to go for hardware-based options which are costly and need to be upgraded with the influx of more traffic. Web acceleration takes care of the same problem by implementing software-based solutions:
1. HTTP Optimisation- A NGINX reverse proxy can be used to accelerate the web traffic on any website by streamlining the intake and exit of data. Clients use a plethora of different devices to access different websites, and these devices range from mobiles to tablets, TVs to smart-watches etc. All these devices process website-data at different speeds and all their connections have a very wide variation in bandwidth. Without content acceleration, the servers would get tied up trying to cater to the client device processing the data it has just received, and the whole workflow would become jagged and slow. By HTTP optimisation, the load balancer acts as a medium between the client and the servers; it assimilates and sends the data in a way which enhances the smoothness and maximises the performance of said servers.
2. Caching and Prefetching- In many cases, the client tries to open the same website or to access the same data over and over again on a server and trying to get that data every time is a waste of precious server processing power. This is why caching is used in web acceleration. It stores the data locally so that time and resources are not wasted when trying to load the same thing. The cached content gets updated at regular intervals so that the data that is showed is not out of date. Prefetching is the process of downloading and caching data that the client is likely to ask for, in advance. This helps in decreasing load-times and increasing smoothness of browsing, for example, the next page of a document is downloaded whenever a page is being read by the client so that there is no delay while changing pages.
3. Compression- The size of the files that are being transferred through a server would hugely affect the speed of transfer. Usually, a video or picture on a website is quite heavy and takes up a lot of time and resources to process. To tackle this problem, compression is done. This brings down the size of these objects down to a much more manageable quantity so that loading the page does not take nearly that much time.
4. SSL/TLS Processing- The process of encrypting and decrypting a file before transmission takes up much-needed server processing power. This power can be saved up and used elsewhere by using a NGINX reverse proxy which takes care of the encryption and decryption process of documents that use Transport Layer Security (TSL) encryption or Secure Sockets Layer (SSL) encryption.
Anonymity and Security
With the increasing number of security breaches happening throughout the internet on a daily basis, secure storage and access to data has become one of the most important parts of any organisation. Since all incoming requests and outgoing data is intercepted by NGINX reverse proxy, it stops any outer entity from knowing the details of any client and also keeps the servers and their data safe during this process. Also, a single record locator or URL acts as the access point for multiple servers regardless of the connection structure of the local network. This helps in preserving the anonymity of individual servers and also helps in simplifying the process of data transfer.
Setting up NGINX Reverse Proxy
Now that the basic functions of a reverse proxy server have been explained, it is time to know how to set up one. The process is pretty simple with a few steps of coding. There are different types of reverse proxy servers available out there but the one which is used most commonly by multinational organisations like Google, Amazon etcetera is NGINX reverse proxy. The level of intuitiveness of the software and the prompt customer support distinguishes NGINX from other competitors. To install NGINX reverse proxy these following things are primarily needed:
Installation process of NGINX Plus on Oracle Linux, Amazon Linux, CentOs, and RHEL:
Almost all current and relevant versions of these operating systems are supported by NGINX reverse proxy. The list of systems which are supported is given below:
To install NGINX Plus on these systems just follow the steps shown below:
1. The first step is to create a /etc/ssl/nginx directory

2. Download the nginx-repo.key and nginx-repo.crt files from NGINX Plus Customer Portal
3. Copy these downloaded files to the directory, i.e. /etc/ssl/nginx

4. Now the next step is to get the ca-certificates dependency installed
5. This step is to download and copy the newest version of the nginx-plus-repo file to the /etc/yum.repos.d/ directory. All these above mentioned operating systems have different versions of the file, corresponding to the respective OS versions.

- Amazon Linux OS:


6. Finally, follow this step to install the downloaded nginx-plus package. If there is any older NGINX Plus package installed on the system then that gets automatically overwritten
Installation process of NGINX Plus on Ubuntu and Debian:
NGINX reverse proxy is also available on a plethora of Ubuntu and Debian Operating Systems. While most versions of these OSs are supported, here is a list of the currently supported versions:
Step-by-step guide to install NGINX Plus on these operating systems:
1. Firstly, create the directory etc/ssl/nginx

2. Download the files nginx-repo.key and nginx-repo.crt from the NGINX Plus Customer Portal
3. Now, copy the downloaded files to the directory that was created a step ago

4. Now access the website nginx.org and download the NGINX signing key

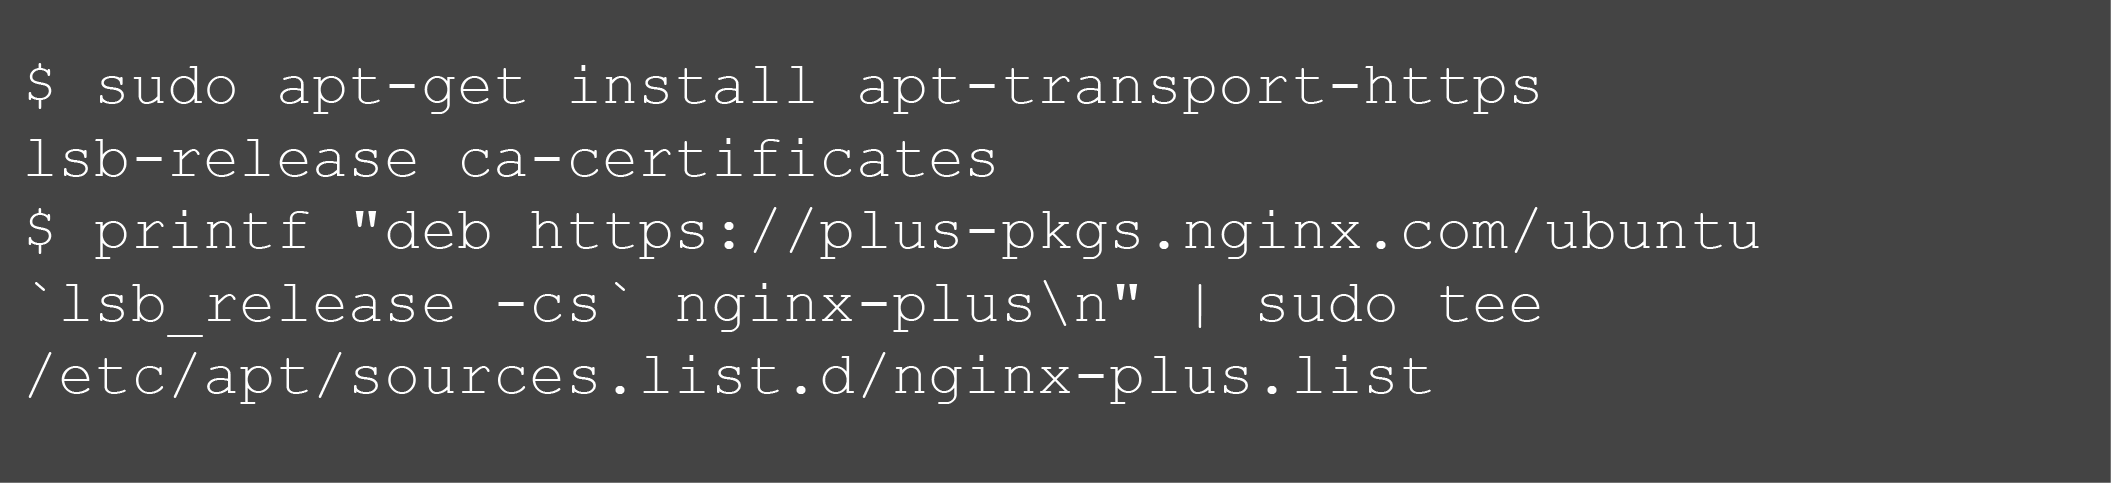
5. Installing the NGINX Plus repository and the apt-utils package is the next step


6. Now download the file named 90nginx and send it to /etc/apt/apt.conf.d

7. The next step is to update repository information
8. Finally, just installing the nginx-plus package is left, which will be done in this step. This will overwrite any previous iteration of the software installed in the system
Installation process of NGINX Plus on FreeBSD:
FreeBSD is an OS which is hardly known to anyone outside the IT and Computer-Science industry as it is mainly used as an OS for servers. Although not visible to the end-users, this operating system acts as a building block in most multinational companies. So, it is obvious that NGINX Plus can be run on most of its current versions, which are:
Here is the step-by-step installation guide for NGINX reverse proxy on all the supported versions of FreeBSD:
1. Again, start by creating a directory /etc/ssl/nginx

2. Now visit the NGINX Plus Customer Portal and log in, then download the files nginx-repo.key and nginx-repo.crt
3. Then copy these downloaded files to the directory created previously, i.e. /etc/ssl/nginx/

4. Now, install the package ca_root_nss which is required for further operation
 5. Copy the file named nginx-plus.conf to the directory /etc/pkg/

6. Now edit the /usr/local/etc/pkg.conf file and add the lines

7. This is the last step of the process, here the nginx-plus package is installed and any older version of the software is overwritten
Installation process of NGINX Plus on SUSE Linux Enterprise Server Operating System:
The Linux SUSE Enterprise Server was developed by an organisation called SUSE. The sole purpose of this OS is to work on servers, workstations, and mainframes. It is also used sometimes to perform tests on desktop computers. NGINX Plus is available on the current version of this OS, i.e.
SUSE Linux Enterprise Server version 12 and 12 SP1 (x86_64)
To install NGINX reverse proxy on this OS just follow these steps:
1. First step, as always, is creating the directory /etc/ssl/nginx

2. Download the ngin-repo.key and nginx-repo.crt files from the NGINX Plus Customer Portal after logging in.
3. Now, create a file bundle for the key and the certificate

4. Again, install the ca-certificates dependency like before

5. Now add the repo file nginx-plus

6. This is the final step and as always, just install the nginx-plus package here, and this will wipe any previous versions of it present on the system
Dynamically Loadable Modules in NGINX Plus:
Now that the software has been installed on the system, here is a basic idea of the Dynamically Loadable modules that can be added in NGINX Plus. The pre-built version of this software comes with a number of utilitarian features, but to add more then some of these extra add-ons have to be used depending on the requirements. Now these modules are divided into three classes, they are:
1. NGINX-made dynamic modules – these are the modules which are designed and maintained by NGINX, Inc. themselves. These modules are:
- nginx-plus-module-image-filter
- nginx-plus-module-geoip
- nginx-plus-module-xslt
- nginx-plus-module-perl
- nginx-plus-module-njs
2. NGINX-certified dynamic modules made by the community – there is a very active community which constantly tries to improve and add to the NGINX Plus features and services. Some of the popular modules in this category get tested by NGINX and these are distributed through the NGINX module repository. These modules are:
- nginx-plus-module-headers-more
- nginx-plus-module-passenger
- nginx-plus-module-set-misc
- nginx-plus-module-rtmp
- nginx-plus-module-lua
3. Community-made dynamic modules – these modules are made and distributed by third party members. Their source code has to be downloaded from the author’s library and compiled against the version of NGINX Open Source which corresponds to the NGINX Plus version that is being used. For a list of such third party modules just visit the NGINX Wiki page.
Installation process of Dynamically Loadable Modules made by NGINX, Inc. in different Operating Systems:
The process of installing NGINX-authored modules is simple and it takes just a single step in different OSs since they can be directly downloaded from the modules repository. Here are the processes for different systems:
Certain modules are unavailable for certain operating systems due to software-based limitations. To get elaborate details about the different modules for NGINX reverse proxy then visit the technical specifications page of NGINX Plus.
Installation process of Dynamically Loadable Modules made by NGINX, Inc. in different Operating Systems:
Since most 3rd party modules are not tested by NGINX they are not available directly through the module repository and installing them is not as simple as the ones which are first party authorised. Also, the reliability of these modules is not guaranteed, so it is best if they are compiled on a separate system so that they don’t affect the system on which the update the NGINX Plus software is to be made. This second system will henceforth be referred to as “test environment” while the primary system will be called “main environment”. The steps that need to be followed to successfully implement a 3rd party module is given below:
1. Preparing the test environment- the test environment needs to have the following aspects:
To ensure that the test environment has all these prerequisites properly set up, just run the correct command:


2. Open Source NGINX- as mentioned earlier, in order to compile and run the 3rd party modules, a prerequisite is the open source NGINX. The steps of getting it are

3. Obtaining the dynamic module source- any directory in the test environment can be used to place the dynamic module in. As an example, here the GitHub module NGINX “Hello World” module is being used

4. Compiling the dynamic module- first, form binary compatibility using the script configure along with the –with-compat option, after which the module using the script make modules can be compiled.

A .so file is generated by this build; now place it in the directory named objs

5. Saving the module- now copy the module file and add the version of the open source NGINX, this makes the process of managing multiple versions of a dynamic module much easier in the main environment.

Activating the different Dynamic modules:
All dynamic modules are sorted and placed in the directory /etc/nginx/modules. This directory is automatically created at the time of installation of NGINX Plus.
To activate a Dynamic Module in NGINX Plus follow the steps:
1. Go to the main context in /etc/nginx/nginx.conf, and add a load_module directive separately for each module that has already installed and needs to be activated

2. Now check whether the new configuration is valid syntactically and restart NGINX Plus
Upgrading the version of NGNIX Plus
After going through this article it is pretty obvious that the importance of keeping an up-to-date version of NGNIX reverse proxy cannot possibly be exaggerated. So, here is the process that needs to be followed in order to update the NGINX plus software whenever new updates are available:
1. If NGINX reverse proxy is already being used in the system and all the present data needs to be kept intact then this step will help in keeping a backup of all configuration and log files


2. This step is for upgrading to the new version of NGINX


![]()
3. Finally, this step is to verify that the version of NGNIX Plus that was just installed is running properly or not

Upgrading the Dynamically Loadable Modules in NGNIX Plus
After upgrading the NGNIX Plus software the last thing that is left to do is to update the modules that are installed. Now the process of doing this varies from module to module and it is dependent on the source from which the module was downloaded and the procedure by which it was installed. Broadly there are two main methods of upgrading modules, they are:
Conclusion
Setting up NGINX Reverse proxy is difficult. It requires the correct sequence and order to follow. It has got few weak points. For instance, it neither supports weighting nor provides a least-connection algorithm. Although there are free handlers available, Nginx will divert the traffic to an overloaded upstream handler. Thus, to curb the insecurity, Lime Proxies can be considered as one of the best alternative. In terms of balancing configuration and monitoring support, it’s the best thing since slice bread.
Post Quick Links
Jump straight to the section of the post you want to read:


About the author
Rachael Chapman
A Complete Gamer and a Tech Geek. Brings out all her thoughts and Love in Writing Techie Blogs.
Related Articles
SEO Proxies and Do They Make A Difference In Your Marketing and Ranking?
Running a website means you should understand the significance of SEO. Know how SEO Proxies Make A Difference In Your Marketing and Ranking
What to Do If Craigslist IP Blocked You?
The reason why you have got blocked from last ad website is because your IP address gave your identity away. Know what to Do If Craigslist IP Blocked you